These photos might give you an idea as to what impact the CS has on the printing in the pocket.
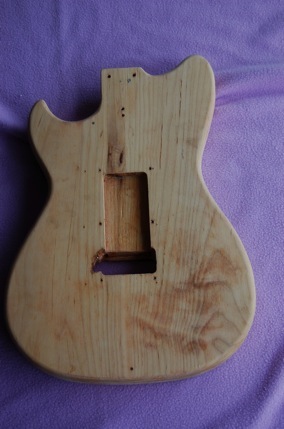
This is what the Trem route looks like from the top with paint. The Trem fully covers excess routing on the top, so I am not going to mess with it.. But not on the back. For the back, I think that I will use some 1/2” thick maple I have left over from our remodel last summer. I am thinking a piece 2” sq., so that there is enough wood in this patch to glue onto the main body, so that it will hold firm. I will cut it out on my saw, outline the plug on the body, route out the middle of the hole, and chisel the out the edges. I should be able to do this with out totally messing it up.
This is the top and back of the guitar. Maple as expected. And not very attractive maple, as also expected. So, what I think I am going to do is dye the back black, nice and thick and opaque. The top I plan on veneering with some quilted maple that I have. It is just wide enough. But fixing the back comes first.
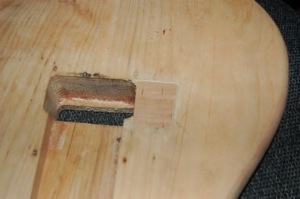
So what I had to do was make some kind of plug to put in this void. What I decided to do was cut a (fairly) square piece of 1/2” thick maple I had into a 1.5” inch square. Then I outlined the piece where I wanted it to go. Then I got out my trusty Dremel tool and I set it up as a router. I did not use my good router because I did not want to route over the lines, and the Dremel isn’t good enough to do that. I routed out most of it to the depth I wanted, and then I used my chisels to get the sides. I split a bit of the wood by the Trem hole, so I glued that back together. I fit the plug in and I glued it down. It is almost perfect. Not quite, but better than I have done in the past. A little wood putty and it won’t look so bad. Also, the plug is about 1/32 or so of an inch too low, but I am not worried. That occured during the clamping process. One thing that I discovered during the testing process is that the maple I used for the plug has one side finished, and I am not sure which side is up & down. I may have to sand that down a bit more than expected.
Oct. 19, 2007
I can’t undo that height difference, do I just forced some wood putty into the crack in an attempt to smooth them and hide them. I don’t know yet how successful I will ultimately be. We shall have to wait & see.
Another problem I discovered is that the Trem mounting bolt extended into the area I was working with, so I had to cut a bit of a clearance into the plug. Again, I used the chisel to do this.
The last thing I did today was to insert the Trem to make sure that it cleared the plug. It did. So all is good.
So for now, I am going to let the body sit and settle and dry out. Some moisture from the CS stuff got into the wood, and I want to let it dry.
The next steps are: Sand the body and apply the veneer. Stain the top, stain the back, nitro, and assemble. For the top, I have mixed up some water based black stain that is transparent. For the back and the “burst” I have some store bought black stain that is very opaque. And it turns out that I have some big MFDs left over from another project, MFDs that I had forgotten that I had. So I don’t have to purchase any more pups.
So basically, all I have to do is finish and assemble. I like that.
Oct 23, 2007
The body is 17” long, & 12” wide. And I found some Koa veneer that I like at a place called The Veneer Store. So I cut some crude templates to put between the body/veneer and the press/weights that I will be using. The other thing I need to do today is sand the top of the body.
I just realized that in a sense, I am doing to this body what Fender did with their Koa Tele and Strat.
I am not going to stain the front, except as needed to hide the edges of the veneer, and to create a bit of a burst effect. The back will get the full opaque black treatment.
I decided to do a bit of metal cleaning while I was waiting for the veneer to show up. So I pulled out the bridge and removed the saddles, and I attacked it with some metal cleaner I gotten from the nice folks at Gibson.
Pretty filthy, as you can see.
And it cleaned up real nice.
Oct. 25, 2007
This is some of the wood that the folks at The Veneer Store sent me. Very pretty, very wavy, figure. It came to me already joined, so that is one more thing that I don’t have to do, and that I will not screw up. BTW: They told me that they have some more of this stuff available.
One thing in veneer. Shipping ain’t cheap. Because this is the container it comes in. If they pack it flat, it breaks. Because veneer is very thin wood, and quite fragile in some ways.
I found the center line of the guitar and veneer, I laid the guitar on top and I used my Dremel tool with a drill bit and I outlined the guitar, well beyond the limits of the guitar.
Then I used a chisel to remove the stuff I didn’t want, and viola. A crude outline of the guitar.
I decided to go the cheap route, regarding my veneer clamp. That is 41lbs of books, and 75lbs of lead on top, and 25lbs of lead over the horn, just in case.


